
Apple released Mac OS X Sierra (Version 10.12) on Sep 20th, 2016. The latest version of the Mac operating system has some great new features like the intro of Siri and Universal Clipboard. Mail didn’t change much but getting a HTML email signature installed in Mail on Sierra have changed a little from El Capitan. For instructions on creating and installing an HTML email signature on OS X El Capitan or earlier Mac operating systems, click on link: http://mydesignpad.com/htmlsignature-install-instructions/. Continue reading for instructions on installing an HTML email signature in Mail on OS X Sierra
Before we start, you need the following to set up a HTML email signature in Mail:
- A Mac computer with Mail running on Mac OS X 10.12.X Sierra.
- A text editing software to read and edit the HTML codes. I recommend using TextEdit since it is preloaded on Mac computer.
- A HTML file coded with your desired email signature design. Use MYDESIGNPAD’s HTML email signature design service if you want us to create a great looking signature design for you.
- A web server for hosting images being used in your design.
- Know how to upload the images to your web server and get image links.
(We offer free images hosting if you use our HTML email signature design service)
STEP 1: Create Placeholder Signature
- Open Mail.app
- On the main menu, go to Mail>Preferences…>Signatures

- Click the + icon located on the bottom of the 2nd column to add new placeholder signature and give it a name that you like. I am naming my signature: MDP-iMac
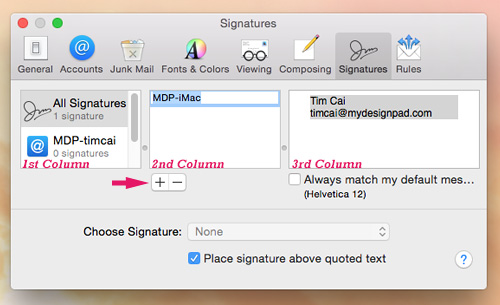
STEP 2: Assign Signature to Desired Email Account
- Drag the placeholder signature into the desired email account on the 1st column
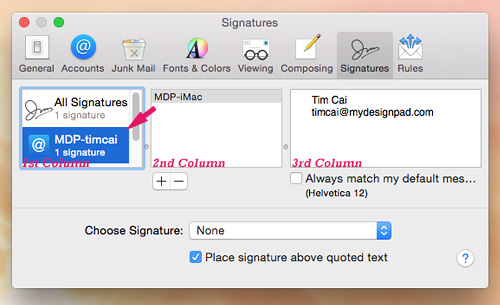
- With the desired email account highlighted on the 1st column, select the placeholder signature from the Choose Signature drop-down menu.

STEP 3: Check Settings for Composing
- Go to Mail>Preferences…>Composing
- Make sure Rich Text is selected for “Message Format”
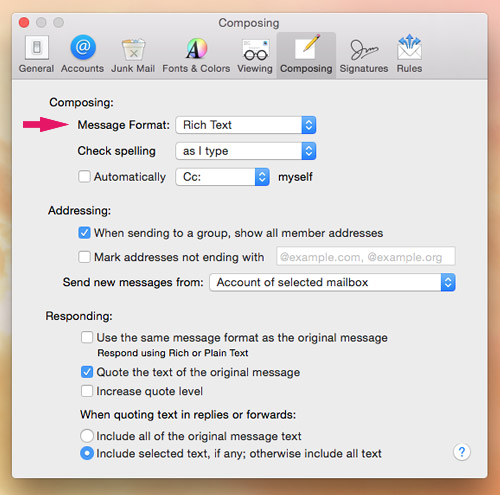
STEP 4: Check Settings for Viewing
- go to Mail>Preferences…>Viewing
- Make sure Load remote content in messages is checked
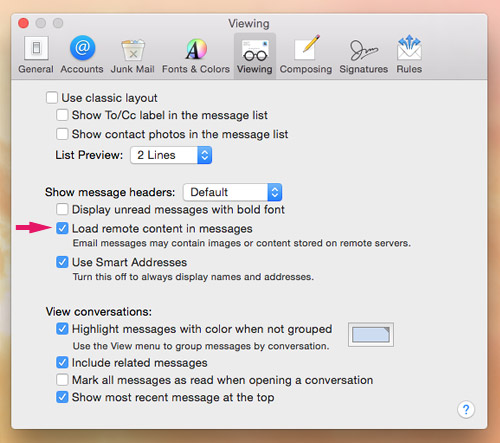
STEP 5: Quit Mail.app
Make sure you do this in order for the HTML email signature to work properly.
- You may press Command+Q to quit or click on Mail>Quit Mail
STEP 6: Copy The HTML Email Signature Code With TextEdit.app
- Right-click on your finalized HTML email signature file or hold down the control key to reveal pop-up menu. A HTML file will be emailed to you if you use MYDESIGNPAD’s Email Signature Service
- Click on “Open With” and select TextEdit.app
- Once the file is open, you will see the HTML code. Select all (Command+A) and Copy (Command+C)
- If you see your HTML email signature design instead of the HTML code, follow STEP 6B to setup TextEdit.app to display HTML code and come back to STEP 6
- After you copy all the HTML code, you may close the file by clicking on the red dot on the upper-right hand corner of the window (Command+W)
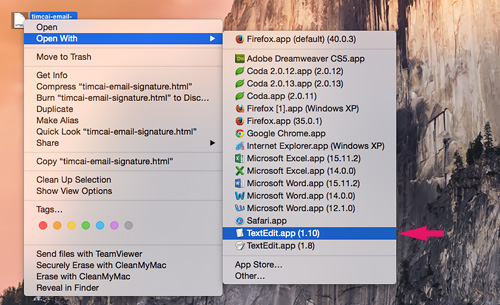
STEP 6B: Set TextEdit.app to Display HTML Files as HTML Code
Skip this step if you were able to see the HTML code in STEP 6.
- Open TextEdit.app: ~/Applications>TextEdit.app

- On the main menu, go to TextEdit>Preferences…>Open and Save
- Check Display HTML files as HTML code instead of formatted text

STEP 7: Locate Placeholder Signature
- Click on your desktop to reveal Finder.
- On the main menu, go to Finder>Go>Library (press and hold the option key to reveal Library on the drop-down menu)

- If not using iCloud, go to ~/Library/Mail/V4/MailData/Signatures/
- If using iCloud Drive, go to ~/Library/Mobile/Documents/com~apple~mail/Data/V4/MailData/Signatures/
- Turn on List view and click on Date Modified to display the latest files on top
- The placeholder signature you just created is the file ending with .mailsignature with the most recent modified date

STEP 8: Open and Update Placeholder Signature
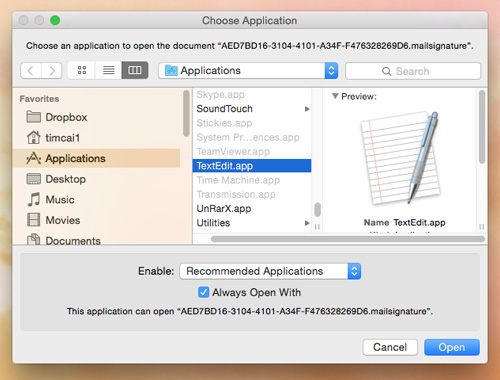
- Open placeholder signature file with TextEdit.app (hold down the option key and click on file to reveal pop-up menu. Click on “Open With” and select TextEdit)

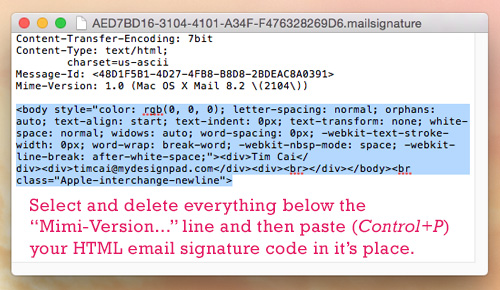
- Select and delete everything under the Mime Version… line
- Press Command+V to paste your HTML email signature code that you have copied earlier into the file. (Your HTML file is emailed to you if you are using our Email Signature Service)
STEP 9: Lock Updated Signature File
Very important step to follow in order for signature to work.
Skip this step if you are using iCloud.
- Click on the downward triangle located on the top right of the opened file
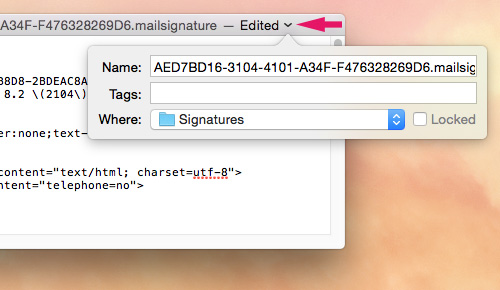
- On the pop-up menu, check Locked
- Quit TextEdit

STEP 10: Restart Mail
- Open Mail back up
- Click on the Compose new message button to open a new message window
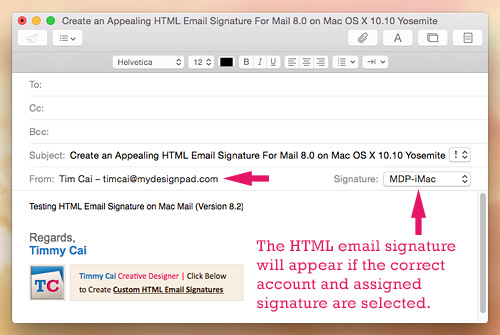
- Your new HTML email signature should appear automatically
- If your HTML email signature doesn’t show up, make sure the correct email account is selected on the From drop-down menu below the Subject line
- Make sure the correct HTML email signature is selected in the Signature drop-down menu as well if you have more than one signature installed
Installation Completed
Congratulations! That is it! Hope you got it working as it should. Go on with Mail as usual. Happy email writing. Contact me or leave a note if you have any questions or comments. If you want a creative and visually appealing HTML email signature and would like to have MYDESIGNPAD create one for you, please click on link for more info: http://mydesignpad.com/htmlsignature/


23 comments »
March 6th, 2017
Message body font size change to 16pt automatically after I add html signature. View from Outlook the size is also 16pt. Does anybody run into this issue? Or I miss something?
March 11th, 2017
Never heard of this before. Did you assign font size to all your texts in your HTML signature?
April 18th, 2017
I have no ‘mail’ under Library. All I see within my library folder is Messages and Modem Scripts
April 18th, 2017
So I located the folder I needed and installed the signature. Now, unfortunately, the links of my signature are not working(clickable) but the link labels show up when I hover over the relevant areas. I have checked and rechecked my HTML and I see no errors. All … brackets are closed and links are using the direct URL’s. When I open the .html file in my safari browser it works perfectly.
May 29th, 2017
The images/icons doesn’t load but everything is working fine. I have pasted the right URLs.
June 13th, 2017
Cesar, are you sure the image links work? Try opening the image links on a web browser to confirm. If all good, make sure you have checked the box that reads, “Load remote content in messages” in Mail>Preferences> Viewing panel.
August 14th, 2017
thank you mr. It was really helpful
August 15th, 2017
thanks very much for posting such a thorough step-by-step explanation with pictures <3 I shared with my office peeps!
August 21st, 2017
I have run into a strange issue that seems to only be present in Sierra from what I can see?
So I installed everything as expected, but my signature butts up to the far left of the message window, when usually there is a 25px Margin on the left side?
Even when I write messages now this too butts up to the left side. The only way to fix it is to tick and then untick the option for “Always match my default message font”, which removes the responsive styles that are applied. Any ideas?
August 28th, 2017
Doesn’t work .Followed all directions. Looks like this method doesnt work in Sierra. Thanks for trying though.
September 5th, 2017
Good day, I followed these steps and my image link is broken in my mac email signatures.
How can I resolve this
September 7th, 2017
Hi Tabitha, make sure that your images are hosted on a web server instead of on your local computer in order for the images to show up in use. Hope this helps.
September 7th, 2017
Derrick, I have tested this method and many of my customers have used this to get their email signatures installed. May you describe what problem you encounter so we can help troubleshoot your problem?
September 7th, 2017
Hi Stuart, that does sound weird. For the html email signature coding, margins doesn’t always translate well in use. Try using just tables and cells to create the spacing that you want. Email programs aren’t as sophisticated as current web browsers.
September 7th, 2017
Hi Lisa, you are very welcome.
September 17th, 2017
Hi Tim, thank you for this tut, it’s really good. I’d followed your step and the html part appears perfectly in my mail signature, excepted the my clickable image. A few peps mentioned it before, that their images seem to be broken. i experience the same issue. My image is hosted on a server, the link works well in the browser and i followed your mail settings. My HTML was created and copied out of dreamweaver. Does anyone face the same issue and has an solution?
February 28th, 2018
exactly followed the steps. does not work on highsierra.
I’ve 6 images hyperlinked and the images do not show up in the signature. the image jpgs are in the same directory as the signature itself.
March 1st, 2018
Great !!! Very very great !! Thank you.
March 9th, 2018
Hi Nitin, make sure your images are uploaded and hosted on a web server. It shouldn’t be in the same directory as the signature itself.
July 3rd, 2018
Thanks so much for this walk-through. I have struggled for many hours to get this figured out since upgrading. You’re a savior. All the best.
July 17th, 2018
Dear Diane, you are very welcome!
December 5th, 2018
I don’t have a .signature file anywhere on my computer. just an accounts.plist in the MailData folder.
December 18th, 2018
Please click on this link: https://www.htmlsignature.com/how-to-create-and-install-a-html-email-signature-in-apple-mail-on-macos-sierra-10-12/ and follow the instructions. For Sierra MacOS 10, the file extensions is “.mailsignature” not “.signature” if you still cannot see any files with that file extension then you have to go back to STEP 1 to create a new placeholder signature in Mail first. Hope this helps.