
Read this post to create an attractive HTML email signature for Mail (Version 11.2) running on Apple’s latest operating system Mac OS X High Sierra (Version 10.13). If you need instructions for creating and installing an HTML email signature on OS X Sierra or earlier Mac operating systems, click this link: http://mydesignpad.com/htmlsignature-install-instructions/
Make sure you have the following before you start:
- A Mac computer running on Mac OS X 10.13.X High Sierra
- Mail (Version 11.2)
- TextEdit (Version 1.13) to read and edit HTML codes
- A email signature design written up in HTML codes. Use MYDESIGNPAD’s HTML email signature design service if you want us to create a great looking signature design for you
- A web server for hosting images used in your design.
(We offer free images hosting if you use our HTML email signature design service)
STEP 1: Create Placeholder Signature
- Open Mail.app
- Go to Mail>Preferences…>Signatures

- Click the + icon located on the bottom of the 2nd column (middle) and name it. I will name it: MDP-iMac
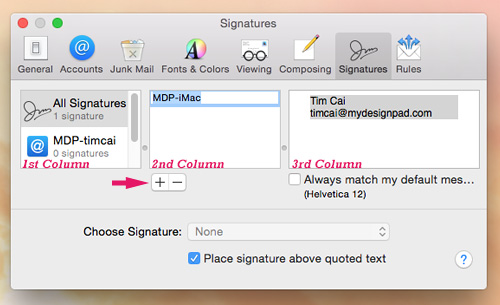
STEP 2: Assign Signature to Email Account
- Drag MDP-iMac into the email account you want on the 1st column (left)
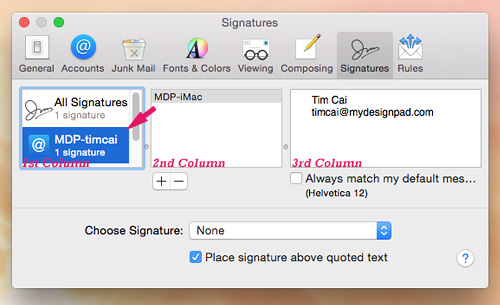
- Click and highlight the email account on the 1st column (If you have more than one email account, click on the account you want this email signature to work with)
- Select MDP-iMac from the Choose Signature drop-down menu.

STEP 3: Check Settings for Composing
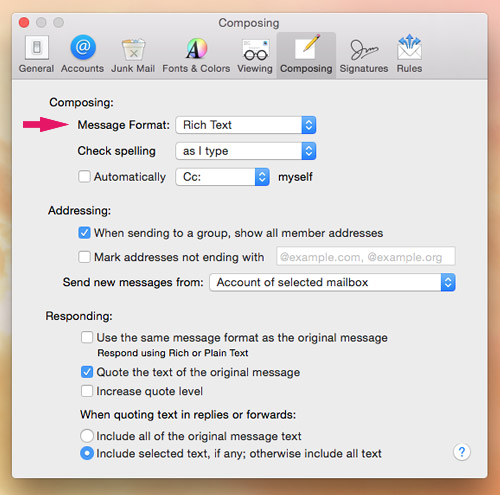
- Go to Mail>Preferences…>Composing
- Make sure Rich Text is selected for “Message Format”
STEP 4: Check Settings for Viewing
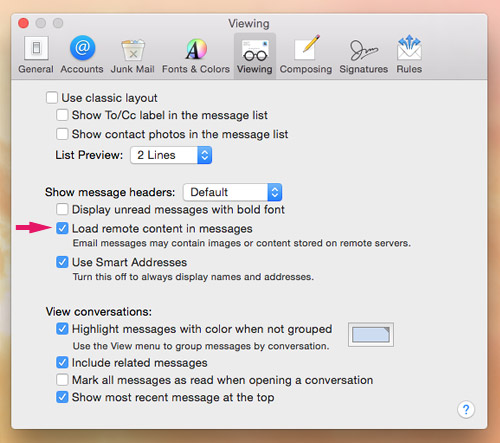
- Go to Mail>Preferences…>Viewing
- Make sure Load remote content in messages is checked
STEP 5: Quit Mail.app
- Press Command+Q or click on Mail>Quit Mail
STEP 6: Set TextEdit.app to Display HTML Codes
- Open TextEdit.app: ~/Applications>TextEdit.app
- Go to TextEdit>Preferences…>Open and Save
- Check Display HTML files as HTML code instead of formatted text
- Check on the red dot on the upper left hand corner to close window

STEP 7: Copy HTML Codes
- Open your email signature HTML file with TextEdit. A HTML file will be emailed to you if you use MYDESIGNPAD’s Email Signature Service
- Once the file is open, you will see the HTML codes. Select all (Command+A) and Copy (Command+C) to your clipboard
- Quit TextEdit
STEP 8: Locate Placeholder Signature
- Click on your desktop to reveal Finder.
- On the main menu, go to Finder>Go>Library (press and hold the option key to reveal Library on the drop-down menu)

- Go to ~/Library/Mail/V5/MailData/Signatures/
- Turn on List view and click on Date Modified to display the latest files on top
- The placeholder signature you just created is the file ending with .mailsignature with the most recent modified date

STEP 9: Update Placeholder Signature
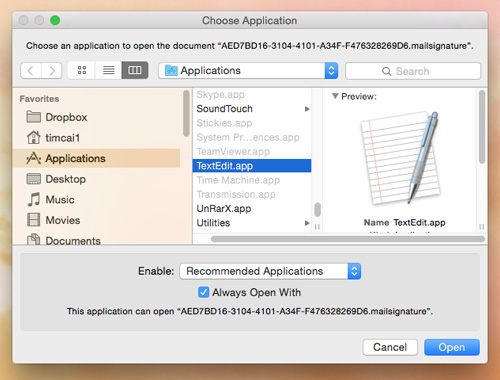
- Open the placeholder signature file with TextEdit

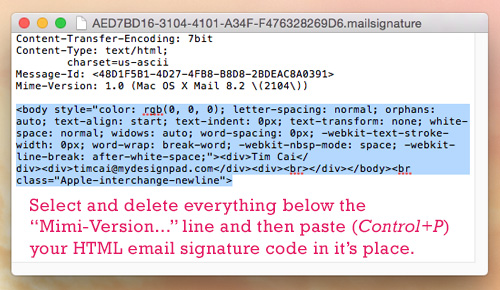
- Select and delete everything under the Mime Version… line
- Press Command+V to paste the HTML codes copied in STEP 7. (Your HTML file is emailed to you if you are using our Email Signature Service)
STEP 10: Lock Updated Signature File
Very important step to follow in order for signature to work.
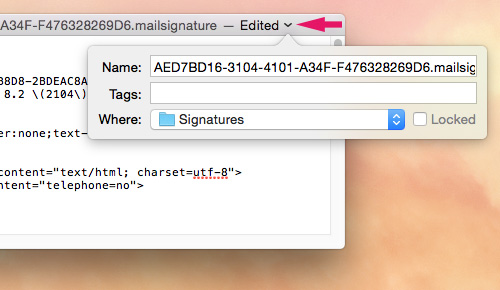
- Click the downward triangle located on the top right of the opened placeholder signature file
- On the pop-up menu, click to check the Locked box
- Quit TextEdit

STEP 10: Check Signature in Mail
- Open Mail back up
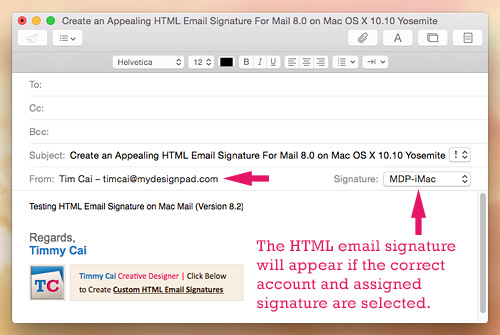
- Click on the Compose new message button to open a new message window
- The new HTML email signature should appear automatically
- If the HTML email signature doesn’t show up, make sure the correct email account is selected on the From drop-down menu below the Subject line
- Make sure the correct HTML email signature is selected in the Signature drop-down menu if you have more than one signature installed
Installation Completed
Congratulations! That is it! Hope you got it working as it should. Go on with Mail as usual. Happy email writing. Contact me or leave a note if you have any questions or comments. If you want a creative and visually appealing HTML email signature and would like to have MYDESIGNPAD create one for you, please click on link for more info: http://mydesignpad.com/htmlsignature/


5 comments »
April 10th, 2018
thank you so much!!
July 10th, 2018
Hi there,
I’ve been following your tutorial and trying for weeks to load my photoshop created signature into apple mail. Every time I think I have it, it either shows up without images or is broken apart. Can you please help :) If I need to load the images onto a server, how do I do that?
Thanks!
July 17th, 2018
Hi Austin, sorry to hear about your trouble. The trick to creating a HTML email signature is that it has to be designed with html codes using basic html coding. If you are creating your design with photoshop and not have your images loaded onto your web server than you may be doing it wrong. To upload images to a web server, you need access to your web server and once logged on, you simply upload the images to your desired folder and the link to your images will be like this:www.website.com/folder/imagename.jpg. I have a service creating HTML signatures with free image hosting service, please check out my service page for more info: http://mydesignpad.com/htmlsignature/
May 20th, 2019
I have followed the tutorial but when I come to open the Signatures folder in my library, it says I don’t have permission. Do you know a work around?
May 27th, 2019
You need to find and locate your .mailsignature files and they can be in 2 different places depending on whether you are using iCloud Drive or not. You are most likely using iCloud Drive, even if you are not using an iCloud email address. Check by going to System Preferences > iCloud, then seeing if the iCloud Drive checkbox is ticked or not. Then if you are using iCloud drive, go to: ~/Library/Mobile\ Documents/com~apple~mail/Data/V4/Signatures/. If you are not using iCloud Drive, go to: ~/Library/Mail/V5/MailData/Signatures/. FIRST, open up your Library folder by going to Finder>Go>Library (Hold down the option key for Library to magically appear on screen)