
On Yosemite, Mac OSX 10.10.X, Apple added some great new features to Mail version 8.X. The good news is that the installation process for an HTML email signature haven’t changed much since Mac OS X 10.9 Mavericks. If you need help installing a custom HTML email signature on Yosemite, follow this tutorial.
Before we start, you need the following to set up a HTML email signature on Mail 8.X:
- A Mac computer with Mail 8.X running on Mac OS X 10.10.X Yosemite.
- A text editing software to read and edit the HTML codes. I recommend using TextEdit since it is preloaded on Mac computer.
- A HTML file coded with your desired email signature design. Use MYDESIGNPAD’s HTML email signature design service if you want us to create a great looking signature design for you.
- A web server for hosting images being used in your design.
- Know how to upload the images to your web server and get image links.
(We offer free images hosting if you use our HTML email signature design service)
STEP 1: Create Placeholder Signature
- Open Mail.app
- On the main menu, go to Mail>Preferences…>Signatures

- Click the + icon located on the bottom of the 2nd column to add new placeholder signature and give it a name that you like. I am naming my signature: MDP-iMac
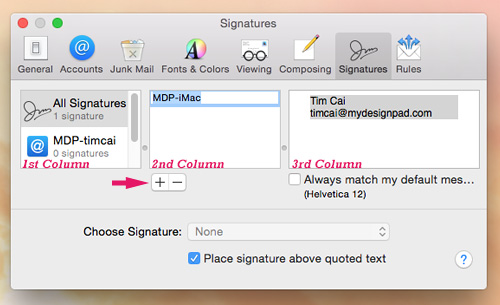
STEP 2: Assign Signature to Desired Email Account
- Drag the placeholder signature into the desired email account on the 1st column
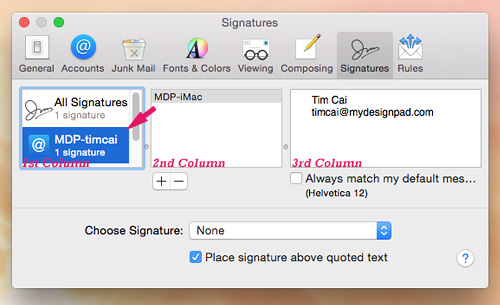
- With the desired email account highlighted on the 1st column, select the placeholder signature from the Choose Signature drop-down menu.

STEP 3: Check Settings for Composing
- Go to Mail>Preferences…>Composing
- Make sure Rich Text is selected for “Message Format”
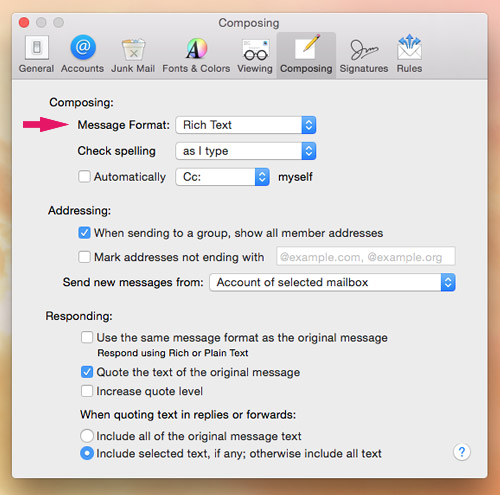
STEP 4: Check Settings for Viewing
- go to Mail>Preferences…>Viewing
- Make sure Load remote content in messages is checked
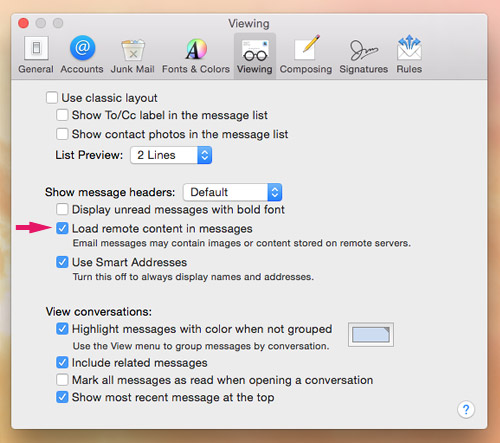
STEP 5: Quit Mail.app
Make sure you do this in order for the HTML email signature to work properly.
- You may press Command+Q to quit or click on Mail>Quit Mail
STEP 6: Copy The HTML Email Signature Code With TextEdit.app
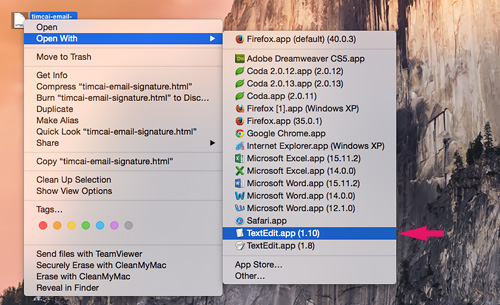
- Right-click on your finalized HTML email signature file or hold down the control key to reveal pop-up menu. A HTML file will be emailed to you if you use MYDESIGNPAD’s Email Signature Service
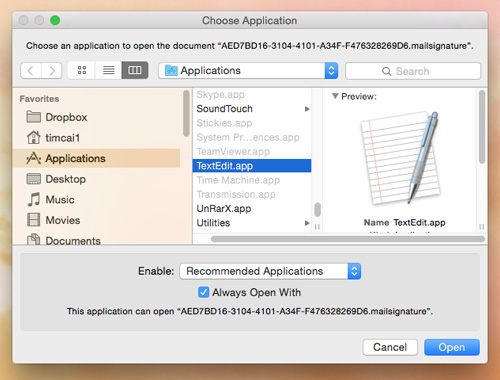
- Click on “Open With” and select TextEdit.app
- Once the file is open, you will see the HTML code. Select all (Command+A) and Copy (Command+C)
- If you see your HTML email signature design instead of the HTML code, follow STEP 6B to setup TextEdit.app to display HTML code and come back to STEP 6
- After you copy all the HTML code, you may close the file by clicking on the red dot on the upper-right hand corner of the window (Command+W)
STEP 6B: Set TextEdit.app to Display HTML Files as HTML Code
Skip this step if you were able to see the HTML code in STEP 6.
- Open TextEdit.app: ~/Applications>TextEdit.app

- On the main menu, go to TextEdit>Preferences…>Open and Save
- Check Display HTML files as HTML code instead of formatted text

STEP 7: Locate Placeholder Signature
- Click on your desktop to reveal Finder.
- On the main menu, go to Finder>Go>Library (press and hold the option key to reveal Library on the drop-down menu)

- If not using iClould, go to ~/Library/Mail/V2/MailData/Signatures/
- If using iCloud Drive, go to ~/Library/Mobile/Documents/com~apple~Mail/Data/MailData/Signatures/
- If using iCloud with iClould Drive off, go to ~/Library/Mobile/Documents/Mail/Data/MailData/Signatures/
- Turn on List view and click on Date Modified to display the latest files on top
- The placeholder signature you just created is the file ending with .mailsignature with the most recent modified date

STEP 8: Open and Update Placeholder Signature
- Open placeholder signature file with TextEdit.app (hold down the option key and click on file to reveal pop-up menu. Click on “Open With” and select TextEdit)

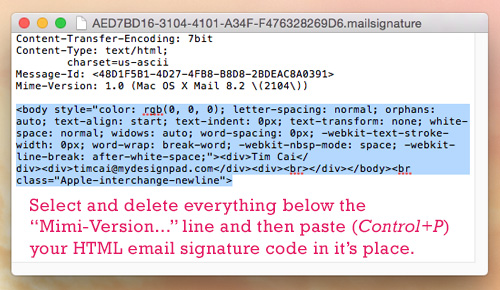
- Select and delete everything under the Mime Version… line
- Press Command+V to paste your HTML email signature code that you have copied earlier into the file. (Your HTML file is emailed to you if you are using our Email Signature Service)
STEP 9: Lock Updated Signature File
Very important step to follow in order for signature to work.
Skip this step if you are using iCloud.
- Click on the downward triangle located on the top right of the opened file
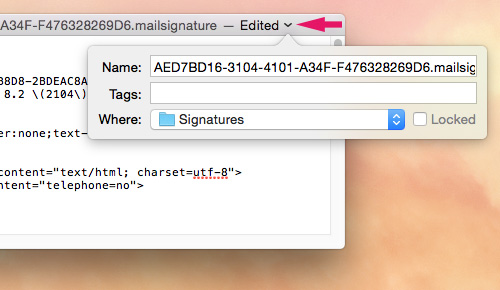
- On the pop-up menu, check Locked
- Quit TextEdit

STEP 10: Restart Mail
- Open Mail back up
- Click on the Compose new message button to open a new message window
- Your new HTML email signature should appear automatically
- If your HTML email signature doesn’t show up, make sure the correct email account is selected on the From drop-down menu below the Subject line
- Make sure the correct HTML email signature is selected in the Signature drop-down menu as well if you have more than one signature installed
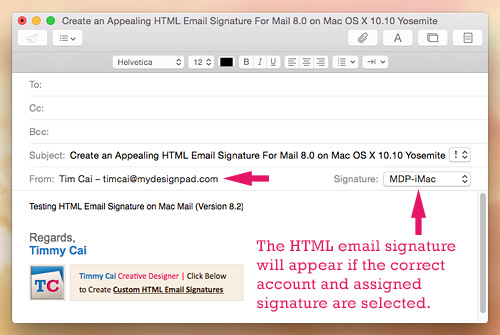
Installation Completed
Congratulations! That is it! Hope you got it working as it should. Go on with Mail as usual. Happy email writing. Contact me or leave a note if you have any questions or comments. If you want a creative and visually appealing HTML email signature and would like to have MYDESIGNPAD create one for you, please click on link for more info: http://mydesignpad.com/htmlsignature/


4 comments »
October 15th, 2015
I’ve followed your instructions, yet the signature displays the HTML code rather than the image. Does it matter that I have the image linked to a website?
January 5th, 2016
It doesn’t matter. Matter of fact, the point of having a html email signature is so you can have images linked to website. I assume that you have either missed a step in the install process or may you have to check your viewing and composing settings to ensure you have html formatting enabled and html remote images allowed.
October 9th, 2016
I got everything in the signature to work except for the links. how do I get the href links to work in the signature?
October 13th, 2016
Jocelyn, make sure that you have the related image uploaded onto a web server first.