
Apple released Mac OS X El Capitan (Version 10.11) on Sep 30th, 2015. The latest version of the Mac operating system has some great new features like Split View, a better Misson Control and Note app and best yet, an improved Mail app. Getting a HTML email signature installed in Mail on El Capitan have changed a little from Yosemite. For instructions on creating and installing an HTMl email signature on OS X Yosemite or earlier Mac operating systems, click on link: http://mydesignpad.com/htmlsignature-install-instructions/. Continue reading for instructions on installing an HTML email signature in Mail on OS X El Capitan
Before we start, you need the following to set up a HTML email signature in Mail 9.X:
- A Mac computer with Mail 9.X running on Mac OS X 10.11.X El Capitan.
- A text editing software to read and edit the HTML codes. I recommend using TextEdit since it is preloaded on Mac computer.
- A HTML file coded with your desired email signature design. Use MYDESIGNPAD’s HTML email signature design service if you want us to create a great looking signature design for you.
- A web server for hosting images being used in your design.
- Know how to upload the images to your web server and get image links.
(We offer free images hosting if you use our HTML email signature design service)
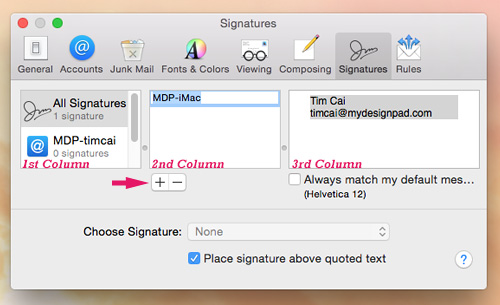
STEP 1: Create Placeholder Signature
- Open Mail.app
- On the main menu, go to Mail>Preferences…>Signatures

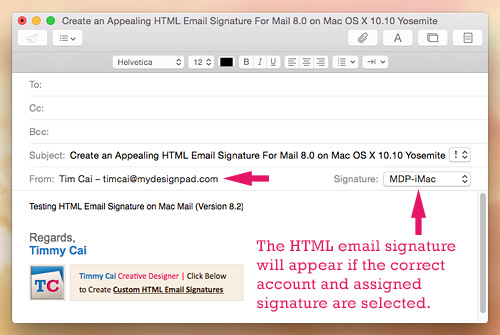
- Click the + icon located on the bottom of the 2nd column to add new placeholder signature and give it a name that you like. I am naming my signature: MDP-iMac
STEP 2: Assign Signature to Desired Email Account
- Drag the placeholder signature into the desired email account on the 1st column
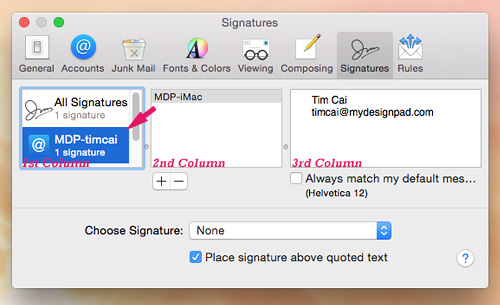
- With the desired email account highlighted on the 1st column, select the placeholder signature from the Choose Signature drop-down menu.

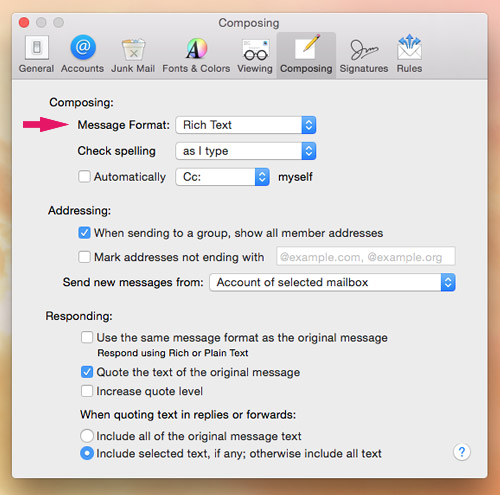
STEP 3: Check Settings for Composing
- Go to Mail>Preferences…>Composing
- Make sure Rich Text is selected for “Message Format”
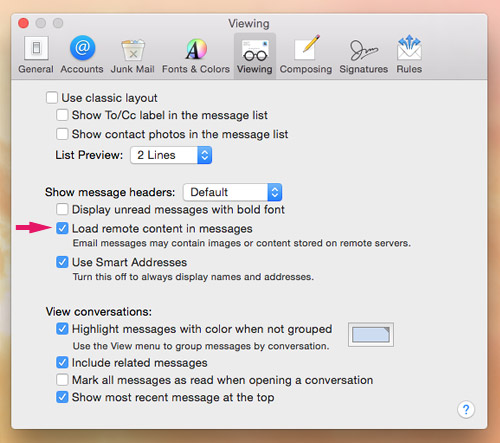
STEP 4: Check Settings for Viewing
- go to Mail>Preferences…>Viewing
- Make sure Load remote content in messages is checked
STEP 5: Quit Mail.app
Make sure you do this in order for the HTML email signature to work properly.
- You may press Command+Q to quit or click on Mail>Quit Mail
STEP 6: Copy The HTML Email Signature Code With TextEdit.app
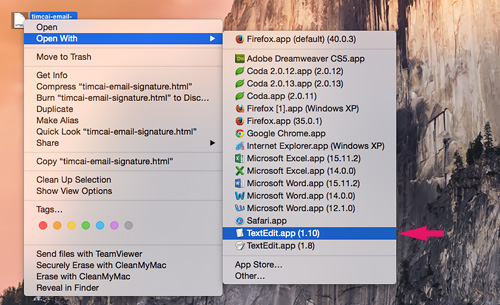
- Right-click on your finalized HTML email signature file or hold down the control key to reveal pop-up menu. A HTML file will be emailed to you if you use MYDESIGNPAD’s Email Signature Service
- Click on “Open With” and select TextEdit.app
- Once the file is open, you will see the HTML code. Select all (Command+A) and Copy (Command+C)
- If you see your HTML email signature design instead of the HTML code, follow STEP 6B to setup TextEdit.app to display HTML code and come back to STEP 6
- After you copy all the HTML code, you may close the file by clicking on the red dot on the upper-right hand corner of the window (Command+W)
STEP 6B: Set TextEdit.app to Display HTML Files as HTML Code
Skip this step if you were able to see the HTML code in STEP 6.
- Open TextEdit.app: ~/Applications>TextEdit.app

- On the main menu, go to TextEdit>Preferences…>Open and Save
- Check Display HTML files as HTML code instead of formatted text

STEP 7: Locate Placeholder Signature
- Click on your desktop to reveal Finder.
- On the main menu, go to Finder>Go>Library (press and hold the option key to reveal Library on the drop-down menu)

- If not using iCloud, go to ~/Library/Mail/V3/MailData/Signatures/
- If using iCloud Drive, go to ~/Library/Mobile/Documents/com~apple~mail/Data/V3/MailData/Signatures/
- Turn on List view and click on Date Modified to display the latest files on top
- The placeholder signature you just created is the file ending with .mailsignature with the most recent modified date

STEP 8: Open and Update Placeholder Signature
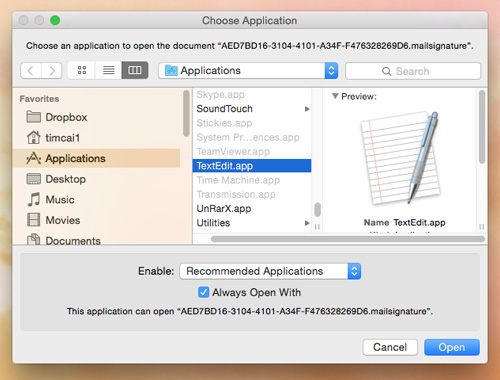
- Open placeholder signature file with TextEdit.app (hold down the option key and click on file to reveal pop-up menu. Click on “Open With” and select TextEdit)

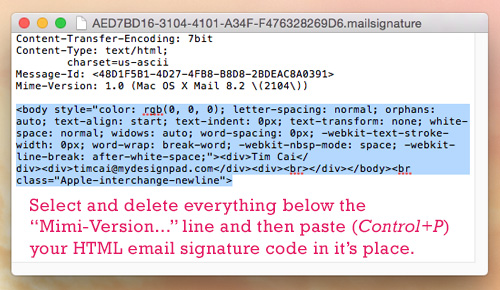
- Select and delete everything under the Mime Version… line
- Press Command+V to paste your HTML email signature code that you have copied earlier into the file. (Your HTML file is emailed to you if you are using our Email Signature Service)
STEP 9: Lock Updated Signature File
Very important step to follow in order for signature to work.
Skip this step if you are using iCloud.
- Click on the downward triangle located on the top right of the opened file
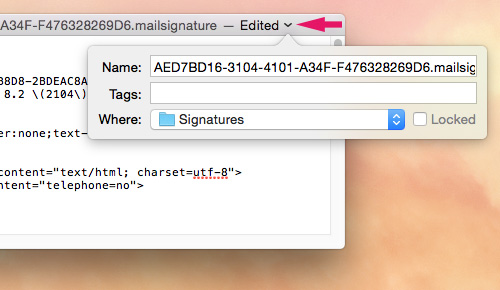
- On the pop-up menu, check Locked
- Quit TextEdit

STEP 10: Restart Mail
- Open Mail back up
- Click on the Compose new message button to open a new message window
- Your new HTML email signature should appear automatically
- If your HTML email signature doesn’t show up, make sure the correct email account is selected on the From drop-down menu below the Subject line
- Make sure the correct HTML email signature is selected in the Signature drop-down menu as well if you have more than one signature installed
Installation Completed
Congratulations! That is it! Hope you got it working as it should. Go on with Mail as usual. Happy email writing. Contact me or leave a note if you have any questions or comments. If you want a creative and visually appealing HTML email signature and would like to have MYDESIGNPAD create one for you, please click on link for more info: http://mydesignpad.com/htmlsignature/


44 comments »
November 10th, 2015
You must be kidding – not a user friendly process – I failed.
On my old Apple computer and software no problem. What the….!
January 5th, 2016
Hi Bill,
After completing process my signature appears in code rather than an image on the end of my eMail. I’ve tried process a few times but get same outcome. Where do you think I’m going wrong? Thanks.
January 5th, 2016
Mark, make sure you lock your file as explained on STEP 9. Let me know if that solved your problem.
January 5th, 2016
Thanks for getting back to me… No still not working, I’ve repeated the process about 6 times but to no avail.
January 7th, 2016
Dear Mark, thank you for emailing me about your email signature issue. Happy that I was able to create a proper HTML file for you and to help you install it remotely with teamviewer. Cheers!
January 14th, 2016
Hi Tim,
I don’t know how to install my
signature on my Email letters..
January 30th, 2016
Worked perfectly! Hallelujah!
thanks so very much! I had tried others who had “the” solution for El Capitan and Apple Mail. So convoluted I got lost. You were simple, clear, and did not expect us to be programmers.
God bless you!
February 2nd, 2016
Thanks Tim, Brilliant service. My signature looks really professional. I received my great looking HTML signature promptly and followed your easy to understand straightforward instructions.
February 5th, 2016
Thanks for a great looking signature, I’ve had others done before but none as good as this. Well done.
February 5th, 2016
I’ve the same problem that Mark
February 12th, 2016
Are you having problem following the tutorial? Let me know what your problem is and I will see if I can offer you some help.
March 25th, 2016
Hello Tim,
Thanks a lot for your tutorial, it is awesome!
I made a signature with cliquable social media icons and it is perfectly working for gmail & outlook, but not on mail. So when i sent email to people that are using mac, they can not click on the social media icon. I am the only one having this trouble?
Have a good week-end.
Marion
March 28th, 2016
I have followed all the steps but unfortunately my signature doesn’t appear. I only have squares with question marks instead of my signature.
Thanks for helping :)
March 28th, 2016
The files of the created ‘temporary’ signature are not showing up in my library>mail>V3>maildata>signatures file?
April 7th, 2016
Thank you, not a simple process, but your instructions have made it a lot easier than so many of the other processes out there. Cheers CK
May 19th, 2016
Thanks !!! it works !
May 24th, 2016
This was extremely helpful! Very straightforward. Much appreciated! Problem solved :)
May 29th, 2016
Marion, the html signatures in my opinion work best with mac mail. I am not sure how your signature was created but if it is coded correct, recipients using mac mail should be able to click on the social icons and link to the respective sites.
May 31st, 2016
Hey Tim – just wanted to send you a quick note of sincere thanks. This process has changed A LOT since I last did this in 2012, and I’d be lost without your help. Thanks from an anonymous friend in the Interwebs. Cheers!
June 19th, 2016
Fantastic! Finally my email signature looks professional. The logo is crisp and clean and the social icons look great. It was a pleasure working with Tim who was prompt and professional. If you’ve tried to use the Signatures feature in Apple MAIL to create your own signatures, you’ll be very familiar with most of the process behind turning the HTML file into a signature file. From the time I received Tim’s email with my custom HTML file until I sent him a thank you with my new signature was less than 10 minutes. Thanks for a great service.
July 21st, 2016
Thank you Steve for your kind words. Hope you enjoy using your new HTML email signature. Here is the link to the service: http://mydesignpad.com/htmlsignature/
July 21st, 2016
Hi Tom, Thank you for your kind note. I am so happy that you find my post useful. I keep this up-to-date so make sure to come back when you need my reference in the near future.
August 10th, 2016
It works, but none of the graphics appear – they look like they need to be downloaded. I’ve started over 5 times, and each time the graphics don’t appear. Any suggestions?
August 11th, 2016
Can´t find the Mail folder!
August 19th, 2016
Hi Rhonda, Make sure the images are hosted on a web server instead of on your local machine. Also make sure you allow remote contents to load in your settings: Mail>Preferences>Viewing. Hope this helps. Let me know.
September 17th, 2016
Hi Tim like many others have already said thank you so much for this tutorial it has been a god send. I have only one thing that tis troubling me, while my html signature shows up in my apple mail on my Mac it does not show up in clouds. I have l iCloud drive checked on my mac but for some reason iCloud is jut not getting the html signature for whatever reason
October 12th, 2016
Thanks a lot for this work ! I tried a lot and yours is the only one working. ;-)
October 13th, 2016
James, you are very welcome. I am not sure what is causing your issue. If I find out anything about this. I will sure to let you know.
November 9th, 2016
Tim,
I cannot find the folder Mail Signatures folder in El Capitan. Has it been renamed? Am I just dumb? Please help…
November 14th, 2016
Andrew, the mail signature folder path in El Capitan is ~/Library/Mail/V3/MailData/Signatures/. For Mac osX Sierra, V3 is now changed to V4. All the rest remains the same.
January 3rd, 2017
Hi there, I copied all of the text from my designer by going to the HTML code view in “Develop” from the link, but when I paste it in and then save it and lock the signature file, it doesn’t show up (nothing shows up). What am I doing wrong?
Also, the .mailsignature file only shows up for me if I type something into it when I create the placeholder, if it’s blank, it seemed that it was not showing up in the signatures folder once I got to that step
January 5th, 2017
Tim Cai was correct about V3 is now V4 in OS X Sierra but, everything else was the same. It worked perfectly, no problems and no issues.
Once you are in the V4/MailData/Signatures/ area, you are able to delete any and all previous signatures. Some of mine where not being used any longer so, its was nice to start fresh.
Thanks again for your detailed tutorial.
February 11th, 2017
Hi Tim, Thanks for the easy and useful tutorial! It works, but my image is showing very big almost the whole page of my mail message. It is hosted on a different server and small 125 x 127px instead of orignal size (1396 x 1396px). Do you have any idea what went wrong?…
February 14th, 2017
make sure that the linked image is in the exact dimensions you wish to use and ensure the it is also the exact dimensions in the html codes.Good luck.
February 14th, 2017
Darrell, my pleasure!
February 14th, 2017
When you create the placeholder, it is ok to have something there. It will get replaced with your designed HTML codes afterwards. First of all, make sure the HTML codes are written up properly. When you locate and open up your placeholder.mailsignature file with textedit, make sure NOT to delete everything before you paste in your own HTML codes. Follow my tutorial to see what needs to stay in the placeholder file. Good Luck.
March 11th, 2017
Hi thanks for this very informative guide. I have gone through the steps several times now but the changes do not seem to stay. When looking at it again it seems to be in step 8 that it fails for me. When opening the signature by option +click it downloads. No drop down menu shows up however much I try. So then the changes I make to the file is not saved in the right folder. How can I fix this please?
March 11th, 2017
Anna, if you have gotten up to Step 8, I assume that you have already located the plac holder signature file in the correct folder directory. If you cannot bring out the drop down menu to select “Open with TextEdit” by holding Option+ Right click on the file, try dragging the file into the TextEdit.app icon. That will also open up the file. Make sure to lock the file after you replace the placeholder text with your HTML codes.
March 12th, 2017
Oh great, now it worked! Thank you Tim :)
April 27th, 2017
Having moved over from PC to Mac recently…
This procedure to get an HTML signature, in 2017(!?) is completely laughable.
June 13th, 2017
This worked! But, does Mac Mail (v9.3) mangle the formatting when it sends? My sig looks fine before I send it, but on the receiving end (gmail) the formatting changes, and bad things happen. Is there any way around that? Great tutorial, thanks for posting this!
June 13th, 2017
Dear Matt, the reason the formatting is different on the receiving end is because each email program understands the html code differently so the spacing and the font size may vary program to program. There is no bullet-proof solution for this. The best way is to acknowledge this limitation and design a signature that is as simple as possible so even if the font size and spacing shift slightly, it will still look ok. Hope this helps.
October 15th, 2018
Hi followed the tutorial, but nothing changed when I open a new mail message. This is still showing “place holder” as the signature.
October 15th, 2018
Hi Nicole, find “Choose Signature” on the bottom of the Signatures preference window and select your new html signature. Make sure your designated email account is also highlighted on the left column.